写在前面
对话框是很常用的组件 , 在很多地方都会用到,一般我们可以使用自带的alert来弹出对话框,但是假如是设计出的图该怎么办呢 ,所以我们需要自己写一个对话框,并且如果有很多地方都用到,那我们很有必要写成一个通用的组件形式,在需要的地方之间引用。
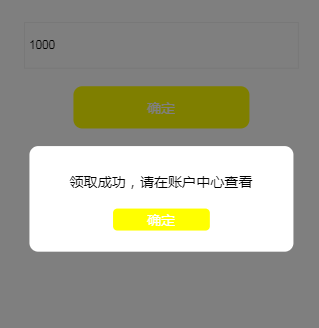
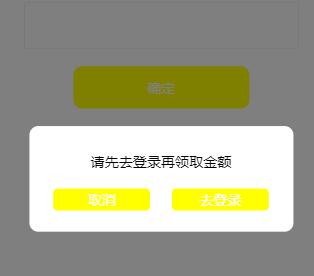
现在我们来动手实现一个对话框组件 ,按照之前的习惯,我们先看下实现的效果图
1.首先,通过template定义一个组件
<template id="dialog">
    <div class="dialog">
      <div class="dialog_mask"></div>
      <div class="dialog_container">
        <div class="dialog_content">
          <div class="dialog_content_top">提示内容</div>
          <div class="dialog_btn">
            <a href="javascript:;" rel="external nofollow" rel="external nofollow" rel="external nofollow" rel="external nofollow" rel="external nofollow" rel="external nofollow" class="btn" @click="close">确定</a>
            <a href="javascript:;" rel="external nofollow" rel="external nofollow" rel="external nofollow" rel="external nofollow" rel="external nofollow" rel="external nofollow" class="btn" @click="close">取消</a>
            <a href="javascript:;" rel="external nofollow" rel="external nofollow" rel="external nofollow" rel="external nofollow" rel="external nofollow" rel="external nofollow" class="btn" @click="login">去登录</a>
          </div>
        </div>
      </div>
    </div>
  </template>
并添加相应的对话框样式
/*对话框style*/
    .dialog{
    }
    .dialog_mask{
      position: fixed;
  left: 0;
  top: 0;
  width: 100%;
  height: 100%;
  background: rgba(0,0,0,0.5);
    }
    .dialog_container{
        background: #fff;
  width: 300px;
  height: 120px;
  position: relative;
  border-radius: 10px;
  margin: 0 auto;
    }
    .dialog_content{
      text-align: center;
  padding-top: 30px;
    }
    .dialog_btn{
      margin-top: 20px;
    }
    .dialog_btn a{
      background: yellow;
        padding: 2px 30px;
  border-radius: 5px;
  color: #fff;
  text-decoration: none;
    width: 50px;
  display: inline-block;
    }
    .dialog_btn a:nth-child(2){
        margin-left: 20px;
    }
2.使用Vue.component注册一个全局Vue组件,我们将这个组件叫做v-dialog,然后通过template指定这个组件
Vue.component('v-dialog', {
      template: '#dialog',
      data:function(){
        return {
        }
      },
      methods:{
      },
      created:function(){
      }
    })
3.最后,在我们需要的地方通过v-dialog标签来引用这个组件
<v-dialog></v-dialog>
创建一个vue组件步骤大致就是这样,但是,父组件和子组件该怎么进行通信呢?
这里主要使用props传递数据到子组件
修改如下上面的代码,添加props属性
Vue.component('v-dialog', {
      template: '#dialog',
          props:['dialogShow','msg'],
      data:function(){
        return {
        }
      },
      methods:{
      },
      created:function(){
      }
    })
可以看到我们是通过字符串数组来定义prop的,除此之外我们还可以用对象的形式来定义prop,用来为组件的 prop 指定验证规则,如果类型错误,在vue中会有警告,其中 type的值可以是这些:String Number Boolean Function Object Array Symbol
props: {
    name: String,
    showDialog: {
      type: Boolean,
      default: false
    }
   }
在组件模板中通过 v-if="showDialog"判断是否显示或隐藏对话框,通过 v-text="msg"绑定对话框提示内容,
v-if="type==1"用于判断对话框类型 ,显示相应的按钮,代码如下:
<template id="dialog">
    <div class="dialog" v-if="showDialog">
      <div class="dialog_mask"></div>
      <div class="dialog_container">
        <div class="dialog_content">
          <div class="dialog_content_top" v-text="msg">提示内容</div>
          <div class="dialog_btn">
            <a v-if="type==1" href="javascript:;" rel="external nofollow" rel="external nofollow" rel="external nofollow" rel="external nofollow" rel="external nofollow" rel="external nofollow" class="btn" @click="close">确定</a>
            <a v-if="type==2" href="javascript:;" rel="external nofollow" rel="external nofollow" rel="external nofollow" rel="external nofollow" rel="external nofollow" rel="external nofollow" class="btn" @click="close">取消</a>
            <a v-if="type==2" href="javascript:;" rel="external nofollow" rel="external nofollow" rel="external nofollow" rel="external nofollow" rel="external nofollow" rel="external nofollow" class="btn" @click="login">去登录</a>
          </div>
        </div>
      </div>
    </div>
  </template>
在引用组件的地方添加 :show-dialog="showDialog" :msg="msg" :type="type"这几个属性,将其值传递给对话框组件
<v-dialog :show-dialog="showDialog" :msg="msg" :type="type"></v-dialog>
需要注意的是showDialog在组件中需要写成show-dialog这种形式,不然会获取不到数据
我们在data中定义这些属性
data: {
        msg:'',
        showDialog:false,
        type:1,// 提示类型 1单按钮提示框 2双按钮提示框
      },
然后,我们在按钮点击提交的时候触发弹出对话框事件
submit:function(){
          //弹出对话框组件
          if(!this.isLogin){//未登录
            this.msg = "请先去登录再领取金额";
            this.showDialog = !this.showDialog;
            this.type = 2;
            return;
          }
          if(this.amount){
            if(this.amount<1 || this.amount>1000){
              this.msg = "输入金额不能低于1元大于1000";
              this.showDialog = !this.showDialog;
              this.type = 1;
            }else{
              this.msg = "领取成功,请在账户中心查看";
              this.showDialog = !this.showDialog;
              this.type = 1;
            }
          }else{
            this.msg = "领取金额不能为空";
            this.showDialog = !this.showDialog;
              this.type = 1;
          }
        }
这样,我们就能弹出对话框组件了,通过msg设置不同的提示消息
那么,我们该怎么关闭这个对话框呢 ,这里就涉及到子组件需要向父组件传递信息了
主要通过$emit来触发父类事件,如:this.$emit('close-dialog');然后在父类通过v-on来监听子类触发的事件,
v-on:close-dialog="closeDialog" ,也可简写写成@close-dialog="closeDialog"
代码如下:
在v-dialog标签中添加@close-dialog="closeDialog"监听子组件触发的事件
<v-dialog :show-dialog="showDialog" :msg="msg" :type="type" @close-dialog="closeDialog"></v-dialog>
然后定义closeDialog函数修改showDialog 的状态
  closeDialog:function(){//关闭对话框
          this.showDialog = false;
        }
这样同样也需要注意的是监听函数closeDialog需要写成close-dialog形式
ok,以上我们就实现了一个对话框组件
写在后面
我们还可以使用slot来分发内容,这样可以用来混合父组件的内容与子组件自己的模板,从而实现组件的高度复用,使得组件更加灵活关于slot的用法可以查看文档https://cn.vuejs.org/v2/guide/components.html#使用插槽分发内容
完整代码已上传到github,地址https://github.com/fozero/front-awesome/blob/master/vue/components/dialog.html,欢迎star~,如果大家有任何疑问欢迎给我留言,小编会及时回复大家的!
发表评论 取消回复