前提
自己前端不熟悉,很多都需要练习
网上找了一个css的demo, 放到微信小程序后,可以运行
图片很大,没有弄,加载可能有点慢(不相关的,就不扯了)
Less环境
Less需要nodejs的npm
nodejs的环境这里略了
自己百度
通过
npm install less -g
安装好 less
(没有用过的,可以理解为 maven的库, gradle库,pods的库)
WebStorm的Less使用
先关联对应的less
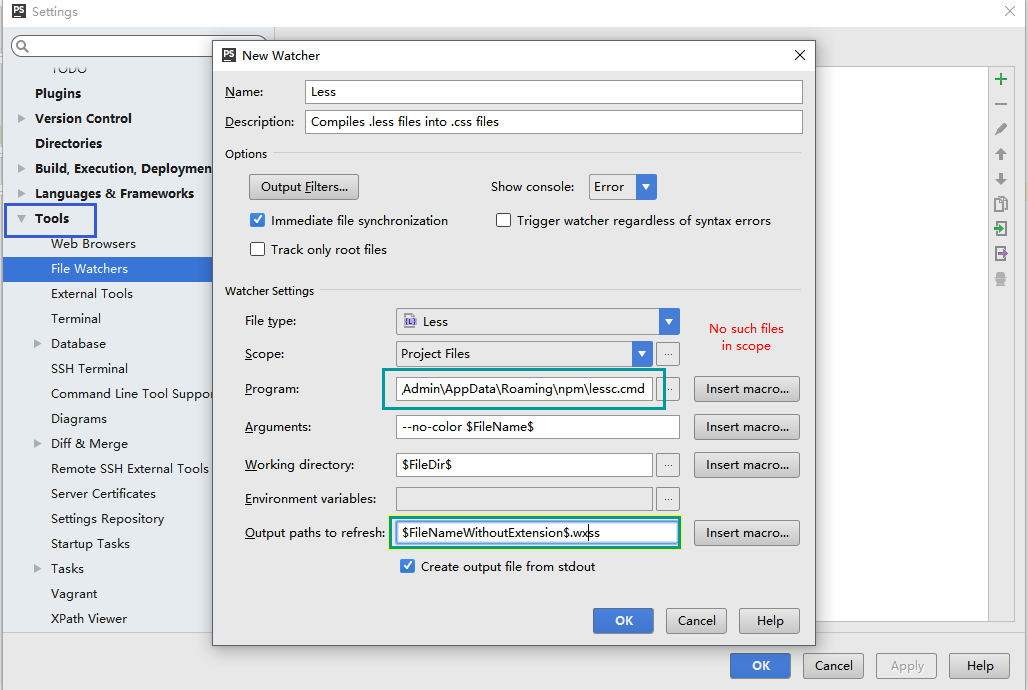
当然,对应的wxss文件,在webstorm中的显示,
可以参考自己其他文章
WebStorm:遇到的问题
这里,只要创建less文件,就会自动生成对应的wxss文件了(当然,写好保存less文件,会自动刷新wxss文件,很方便吧)
直接wxss和 less的比较
我们先看下页面
页面很简单
就只有一个 sky 套用 3个cloud 类
view class="container">
 <view class="sky">
  <view class="clouds_one"> </view >
  <view class="clouds_two"> </view >
  <view class="clouds_three"> </view >
  <view class="clouds_three"></view>
 </view>

</view>
再看看css
.sky {
 height: 480px;
 background: #007fd5;
 position: relative;
 overflow: hidden;
 animation: sky_background 50s ease-out infinite;
}
.sky .clouds_one {
 background: url("../../resources/cloud/cloud_one.png");
 position: absolute;
 left: 0;
 top: 0;
 height: 100%;
 width: 300%;
 animation: cloud 50s linear infinite;
 transform: translate3d(0, 0, 0);
}
.sky .clouds_two {
 background: url("../../resources/cloud/cloud_two.png");
 position: absolute;
 left: 0;
 top: 0;
 height: 100%;
 width: 300%;
 animation: cloud 75s linear infinite;
 transform: translate3d(0, 0, 0);
}
.sky .clouds_three {
 background: url("../../resources/cloud/cloud_three.png");
 position: absolute;
 left: 0;
 top: 0;
 height: 100%;
 width: 300%;
 animation: cloud 120s linear infinite;
 transform: translate3d(0, 0, 0);
}
@keyframes cloud {
 0% {
 left: 0;
 }
 100% {
 left: -200%;
 }
}
我们发现有很多重复的地方
功能不难,但是占了70行,并且很难复用
修改的画,还要看里面的逻辑
修改也不方便
Less的使用
我们简单定义变量 和 方法以后
用less 大体是这样的
@dodo-out-height : 480px; //@dodo-out-height : 480rpx;
@dodo-bg-sky : #007fd5;
@dodo-img-url-clouds_one : "../../resources/cloud/cloud_one.png";
@dodo-img-url-clouds_two : "../../resources/cloud/cloud_two.png";
@dodo-img-url-clouds_three : "../../resources/cloud/cloud_three.png";

.sky {
 height: @dodo-out-height;
 background: @dodo-bg-sky;
 position: relative;
 overflow: hidden;
 animation: sky_background 50s ease-out infinite;
}
.sky .clouds_one {
 .dodo_clouds(@url:@dodo-img-url-clouds_one, @time: 50s)
}
.sky .clouds_two {
 .dodo_clouds(@url:@dodo-img-url-clouds_two, @time: 75s)
}
.sky .clouds_three {
 .dodo_clouds(@url:@dodo-img-url-clouds_three, @time: 120s)
}
.dodo_clouds (@url: @dodo-img-url-clouds_one, @height: 100%, @width: 300%, @time: 100s){
 background: url(@url);
 position: absolute;
 left: 0;
 top: 0;
 height: 100%;
 width: 300%;
 animation: cloud @time linear infinite;
 transform: translate3d(0, 0, 0);
}
@keyframes cloud {
 0% {
 left: 0
 }
 100% {
 left: -200%
 }
}
保存后,
我们发现对应的wxss文件,也改变了,直接生成了可以读取的文件
和之前直接写的文件没有太大区别
也不会出现对应的变量和方法
.sky {
 height: 480px;
 background: #007fd5;
 position: relative;
 overflow: hidden;
 animation: sky_background 50s ease-out infinite;
}
.sky .clouds_one {
 background: url("../../resources/cloud/cloud_one.png");
 position: absolute;
 left: 0;
 top: 0;
 height: 100%;
 width: 300%;
 animation: cloud 50s linear infinite;
 transform: translate3d(0, 0, 0);
}
.sky .clouds_two {
 background: url("../../resources/cloud/cloud_two.png");
 position: absolute;
 left: 0;
 top: 0;
 height: 100%;
 width: 300%;
 animation: cloud 75s linear infinite;
 transform: translate3d(0, 0, 0);
}
.sky .clouds_three {
 background: url("../../resources/cloud/cloud_three.png");
 position: absolute;
 left: 0;
 top: 0;
 height: 100%;
 width: 300%;
 animation: cloud 120s linear infinite;
 transform: translate3d(0, 0, 0);
}
@keyframes cloud {
 0% {
 left: 0;
 }
 100% {
 left: -200%;
 }
}
预览下:
也没有区别,只是代码写起来更方便(建议机子配置可以的画,开发别用微信提供的ide,效率太低)
less很强大,其他的地方,有时间再深入,
感觉less好用在于它的复用性 :)
简单demo源码:http://xiazai.uoften.com/201703/yuanma/weapp-start-master(uoften.com).rar
感谢阅读,希望能帮助到大家,谢谢大家对本站的支持!
发表评论 取消回复