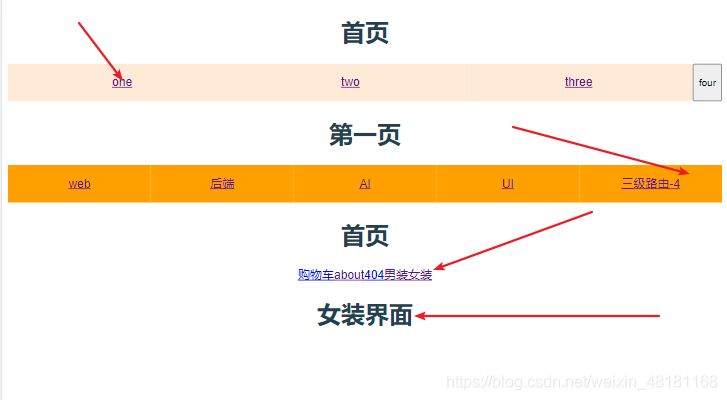
实现效果:
首先创建五个vue界面
1.home.vue页面
<template>
  <div id="home-wrapper">
    <h1>{{ name }}</h1>
    <nav>
      <!-- 二级路由的出口 在一级路由的界面里面 -->
      <router-link to="/one">one</router-link>
      <router-link :to="{ name: 'Two' }">two</router-link>
      <router-link :to="threeObj">three</router-link>
      <!-- 编程式  导航/路由 -->
      <button @click="fourBtn">four</button>
    </nav>
     <router-view></router-view>
  </div>
</template>

<script>
export default {
  data() {
    return {
      name: "首页",
      threeObj: {
        name: "Three",
      },
    };
  },
  methods: {
    fourBtn() {
      var userId = 6789;
      this.$router.push({
        path: `four/${userId}`,
      });
    },
  },
};
</script>

<style lang="less" scoped>
#home-wrapper{
  nav{
    display: flex;
    a{
      flex: 1;
      background-color: antiquewhite;
      height: 50px;
      line-height: 50px;
    }
  }
}
</style>
2.one.vue界面
<template>
    <div>
        <h1>{{name}}</h1>
        <ul>
            <li>
                <router-link to="/levl31">web</router-link>
            </li>
            <li>
                <router-link :to="{name:'name32'}">后端</router-link>
            </li>
            <li>
                <!-- 使用命名路由 在多级路由里面  比较方便 -->
                <router-link :to="{name:'name33'}">AI</router-link>
            </li>
            <li>
                <router-link to="/one/levl34">UI</router-link>
            </li>
            <li>
                <router-link :to="{name:'name35'}">三级路由-4</router-link>
            </li>
        </ul>
        <!-- 三级路由  出门在二级路由的界面 -->
        <router-view></router-view>

    </div>
</template>

<script>
    export default {
        name:'One',
        data() {
            return {
                name: "第一页"
            }
        },

    }
</script>

<style lang="less" scoped>
ul{
    list-style: none;
    display: flex;
    width: 100%;
    margin-left: -40px;

}
li{
    flex: 1;
    background-color: orange;
    height: 50px;
    line-height: 50px;

}

</style>
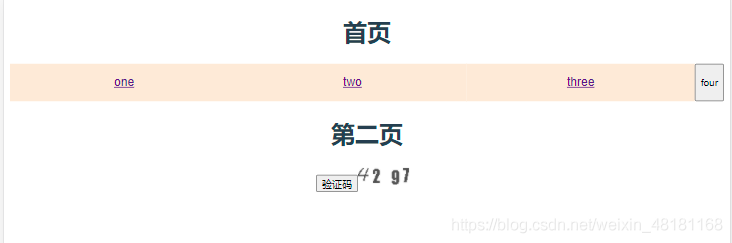
3.two.vue页面以及验证码实现
实现效果图:
<template>
  <div>
    <h1>{{ name }}</h1>
    <button @click="changeCode">验证码</button>
    <img :src="imgCodeUrl" alt="">
  </div>
</template>

<script>
export default {
  // 组件的别名  在vue调试的时候方便查看
  name: "Two_zh",
  data() {
    return {
      name: "第二页",
      imgCodeUrl:""
    };
  },
  methods: {
    // 获取验证码
    changeCode() {
        // /api 是在vue.config.js 里面代理配置
      const url = "api/v1/captchas";
    //   const url = "https://elm.cangdu.org/v1/captchas";
      this.axios
        .post(url, {})
        .then((res) => {
            this.imgCodeUrl =res.data.code
          console.log("验证码接口:",res);
        })
        .catch((e) => {
          console.log("错误:", e);
        });
    },
  },
};
</script>

<style lang="less" scoped>
</style>
4. three.vue页面
<template>
    <div>
        <h1>{{name}}</h1>

    </div>
</template>

<script>
    export default {
        name:'three',
        data() {
            return {
                name: "第三页"
            }
        },

    }
</script>

<style lang="less" scoped>

</style>
5.four.vue页面
<template>
    <div>
        <h1>{{name}}</h1>

    </div>
</template>

<script>
    export default {
        name:'Four',
        data() {
            return {
                name: "第四页"
            }
        },
        created() {
            console.log("第四页 created:",this.$route)
        },
    }
</script>

<style lang="less" scoped>

</style>
然后配置路由:
import Vue from 'vue'
import VueRouter from 'vue-router'
import Home2 from '@/views/day/home.vue'

Vue.use(VueRouter)

const routes = [
  {
    path: "/",
    name: 'home2',
    component: Home2,
    redirect: "/one",
    children: [
      {
        path: "/one",
        name: 'One',
        component: () => import("@/views/day/one.vue"),
        children: [
          {
            path: '/levl31',
            // h creacteElemet 的意思 创建 虚拟Dom/标签 Vnode
            // 第一个参数是 标签名  扩展的话  自己的写的组件   也是标签名
            // 第二个参数是  可选的  标签的属性配置
            // 第三个参数是  标签的内容
            component: {
              render(h) {
                return h("h1", "前端")
              }
            },
          },
          {
            // /默认代表根目录  #/levl31
            // 不带斜杠  会自己拼接 #/one/levl32
            // 使用的时候统一用命名路由
            path: "levl32",
            name: "name32",
            component: {
              render(h) {
                return h("h1", "后端")
                }
              },
            },
            {
              path:"/one?levl33",
              name:"name33",
              component:{
                render(h) {
                  return h("h1", "人工智能")
                  }
              }
            },
            {
              path:"/one/levl34",
              name:"name34",
              component:{
                render(h) {
                  return h("h1","就是个美工吗")
                  }
              }
            },
            //  三 四级路由
            {
              path:"level35",
              name:"name35",
              component:()=>import("@/views/Home.vue"),
              // 四级路由
              children:[
                {
                  path:"boy",
                  name:"Boy",
                  component:()=>import("@/views/boy.vue")
                },
                {
                  path:"girl",
                  name:"Girl",
                  component:()=>import("@/views/girl.vue")
                }

              ]

            }
        ]
      },
      {
        path: "/two",
        name: 'Two',
        component: () => import("@/views/day/two.vue")
      },
      {
        path: "/three",
        name: 'Three',
        component: () => import("@/views/day/three.vue")
      },
      {
        // 可选参数  d  数字  字符串就匹配不上
        path: "four/:id(\d*)?",
        name: 'Four',
        component: () => import("@/views/day/four.vue")
      },
    ]
  }
]

const router = new VueRouter({
  routes
})

export default router
总结
到此这篇关于vue实现四级导航及验证码的文章就介绍到这了,更多相关vue四级导航及验证码内容请搜索悠悠之家以前的文章或继续浏览下面的相关文章希望大家以后多多支持悠悠之家!
发表评论 取消回复