四种设置圆角的方法
从网上收集了各种设置圆角的方法,总结起来有以下四种:
1、设置 layer 的 cornerRadius
view.layer.masksToBounds = YES;
view.layer.cornerRadius = imgSize.width / 2;
2、用贝塞尔曲线作 mask 圆角
CAShapeLayer *layer = [CAShapeLayer layer];
UIBezierPath *aPath = [UIBezierPath bezierPathWithOvalInRect:view.bounds];
layer.path = aPath.CGPath;
view.layer.mask = layer;
3、重新绘制圆角
dispatch_async(dispatch_get_global_queue(DISPATCH_QUEUE_PRIORITY_DEFAULT, 0), ^{
    UIImage *image = view.image;
    image = [image drawCircleImage];
    dispatch_async(dispatch_get_main_queue(), ^{
     view.image = image;
    });
   });
////////////////////////
@implementation UIImage (RoundedCorner)

- (UIImage *)drawCircleImage {
 CGFloat side = MIN(self.size.width, self.size.height);
 UIGraphicsBeginImageContextWithOptions(CGSizeMake(side, side), false, [UIScreen mainScreen].scale);
 CGContextAddPath(UIGraphicsGetCurrentContext(),
      [UIBezierPath bezierPathWithOvalInRect:CGRectMake(0, 0, side, side)].CGPath);
 CGContextClip(UIGraphicsGetCurrentContext());
 CGFloat marginX = -(self.size.width - side) / 2.f;
 CGFloat marginY = -(self.size.height - side) / 2.f;
 [self drawInRect:CGRectMake(marginX, marginY, self.size.width, self.size.height)];
 CGContextDrawPath(UIGraphicsGetCurrentContext(), kCGPathFillStroke);
 UIImage *output = UIGraphicsGetImageFromCurrentImageContext();
 UIGraphicsEndImageContext();
 return output;
}

@end
4、混合图层,用一张镂空的透明图片作遮罩

cover@2x.png
UIView *parent = [view superview];
UIImageView *cover = [[UIImageView alloc] initWithFrame:CGRectMake(0, 0, imgSize.width, imgSize.height)];
cover.image = [UIImage imageNamed:@"cover"];
[parent addSubview:cover];
cover.center = view.center;
四种方法性能测试
网上流传两个结论:
- 第一种方法会引发离屏渲染,所以是最慢的;
- 据说第四种是效率最高的。
事实情况如何呢?
为了验证网上的结论,需要找一种性能比较的方法,这里用 Instrument 的测试 FPS (帧数)作为性能直观的比较值,测试过程如下:
- 搭建collectionView 工程,连续刷新显示 1万个cell,每个cell使用相同图片,排除不同照片带来的差异;
- 在真机下运行分别运行四种方法,用 Instrument 记录,并计算平均FPS;
- 为保证平均值准确,去掉头尾帧数率过低的时间段。
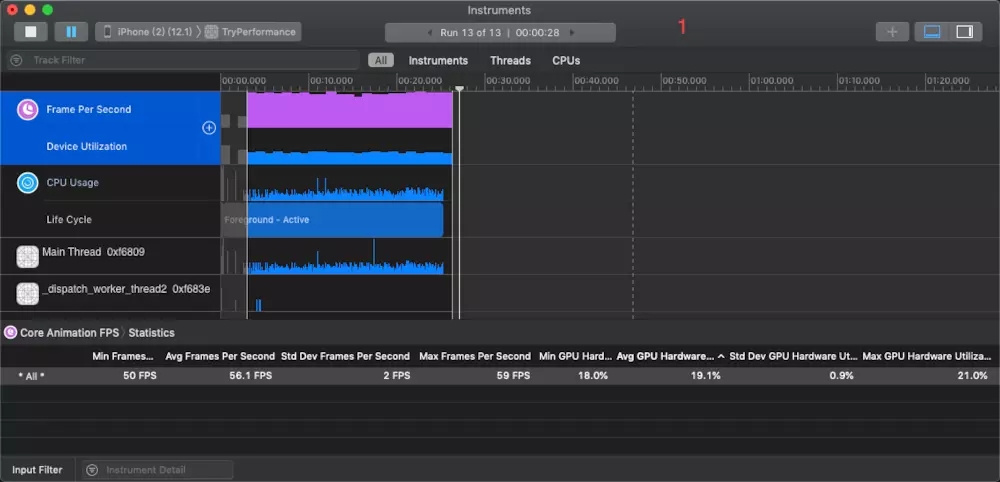
1. 设置 layer 的 cornerRadius
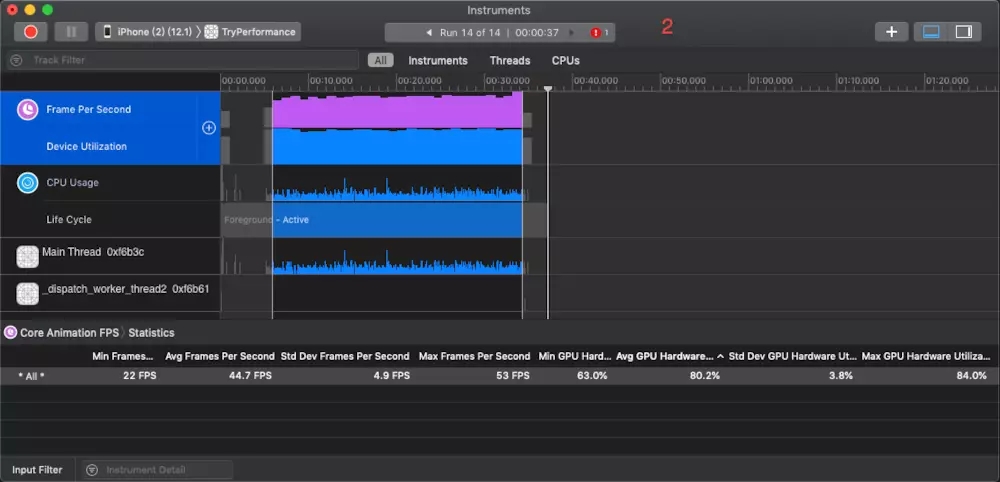
2. 用贝塞尔曲线作 mask 圆角
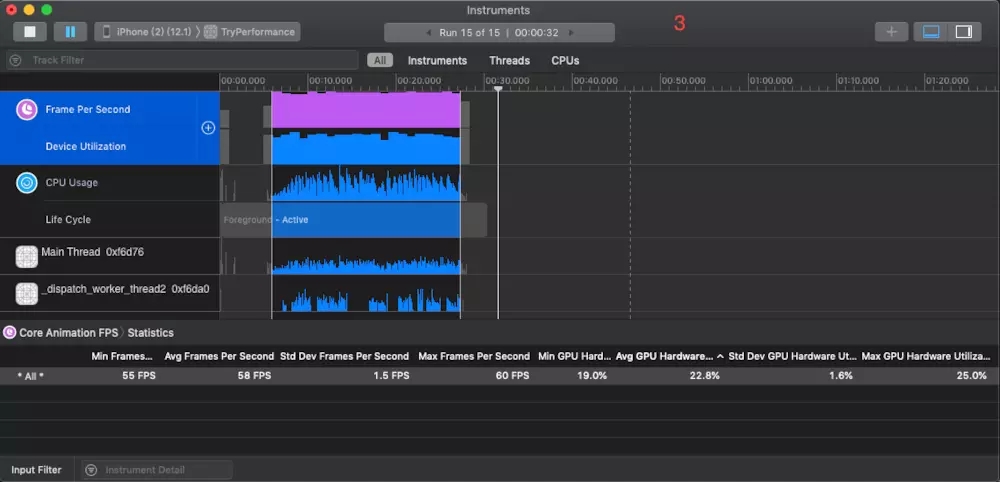
3. 重新绘制圆角
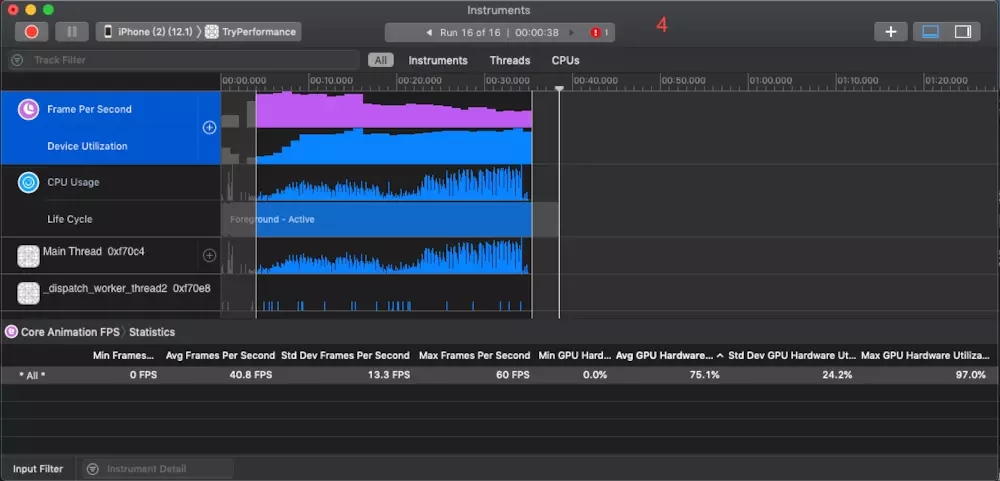
4. 混合图层,用一张镂空的透明图片作遮罩
结果排名如下
3 > 1 > 2 > 4
一点点优化
第四种方式不但垫底,而且出奇的慢,说明我们的实现有明显的问题,观察代码,发现原来的代码没有考虑 cell 复用,cove 视图被反复添加到cell,哪有不慢的道理!!! 于是作以下优化:
// 4. 混合图层,用一张镂空的透明图片作遮罩 (优化版)
UIView *parent = [view superview];
if (![parent viewWithTag:13]) {
 UIImageView *cover = [[UIImageView alloc] initWithFrame:CGRectMake(0, 0, imgSize.width, imgSize.height)];
 cover.image = [UIImage imageNamed:@"cover"];
 cover.tag = 13;
 [parent addSubview:cover];
 cover.center = view.center;
}
这样避免了View的重复添加,FPS 有了明显的回升:

4.(优化版)
优化后的排名: 3 > 4 > 1 > 2
结论
测试的结论与网上流传的几乎完全不同,分析一下造成这种情况的原因:
- 苹果在iOS9后优化了 cornerRadius 的绘图方式,方法1不再需要离屏渲染。
- 方法3基于单张位图运算,方法2使用了矢量并与位图叠加,导致运算量上升,观察图2的GPU运算量高达 80.2%,证明了这一推断。
实际开发建议
- 方法1 设置简单,性能差别不明显,简单圆角场景下推荐使用。
- 方法4 基于透明位图,可用于异形遮罩,但需要根据图片大小做多张特殊位图,请根据实际情况选择。
- 在位图尺寸很大,数量很多的情况下,用方法3,但要注意内存警告,最好配合缓存机制使用,避免因内存溢出而崩溃。
总结
以上就是这篇文章的全部内容了,希望本文的内容对大家的学习或者工作具有一定的参考学习价值,如果有疑问大家可以留言交流,谢谢大家对悠悠之家的支持。
发表评论 取消回复