我们主要讲解一下利用Python实现感知机算法。
算法一
首选,我们利用Python,按照上一节介绍的感知机算法基本思想,实现感知算法的原始形式和对偶形式。
#利用Python实现感知机算法的原始形式
# -*- encoding:utf-8 -*-

"""
Created on 2017.6.7

@author: Ada
"""

import numpy as np
import matplotlib.pyplot as plt

#1、创建数据集
def createdata():
 samples=np.array([[3,-3],[4,-3],[1,1],[1,2]])
 labels=[-1,-1,1,1]
 return samples,labels

#训练感知机模型
class Perceptron:
 def __init__(self,x,y,a=1):
  self.x=x
  self.y=y
  self.w=np.zeros((x.shape[1],1))#初始化权重,w1,w2均为0
  self.b=0
  self.a=1#学习率
  self.numsamples=self.x.shape[0]
  self.numfeatures=self.x.shape[1]

 def sign(self,w,b,x):
  y=np.dot(x,w)+b
  return int(y)

 def update(self,label_i,data_i):
  tmp=label_i*self.a*data_i
  tmp=tmp.reshape(self.w.shape)
  #更新w和b
  self.w=tmp+self.w
  self.b=self.b+label_i*self.a

 def train(self):
  isFind=False
  while not isFind:
   count=0
   for i in range(self.numsamples):
    tmpY=self.sign(self.w,self.b,self.x[i,:])
    if tmpY*self.y[i]<=0:#如果是一个误分类实例点
     print '误分类点为:',self.x[i,:],'此时的w和b为:',self.w,self.b
     count+=1
     self.update(self.y[i],self.x[i,:])
   if count==0:
    print '最终训练得到的w和b为:',self.w,self.b
    isFind=True
  return self.w,self.b

#画图描绘
class Picture:
 def __init__(self,data,w,b):
  self.b=b
  self.w=w
  plt.figure(1)
  plt.title('Perceptron Learning Algorithm',size=14)
  plt.xlabel('x0-axis',size=14)
  plt.ylabel('x1-axis',size=14)

  xData=np.linspace(0,5,100)
  yData=self.expression(xData)
  plt.plot(xData,yData,color='r',label='sample data')

  plt.scatter(data[0][0],data[0][1],s=50)
  plt.scatter(data[1][0],data[1][1],s=50)
  plt.scatter(data[2][0],data[2][1],s=50,marker='x')
  plt.scatter(data[3][0],data[3][1],s=50,marker='x')
  plt.savefig('2d.png',dpi=75)

 def expression(self,x):
  y=(-self.b-self.w[0]*x)/self.w[1]#注意在此,把x0,x1当做两个坐标轴,把x1当做自变量,x2为因变量
  return y

 def Show(self):
  plt.show()


if __name__ == '__main__':
 samples,labels=createdata()
 myperceptron=Perceptron(x=samples,y=labels)
 weights,bias=myperceptron.train()
 Picture=Picture(samples,weights,bias)
 Picture.Show()
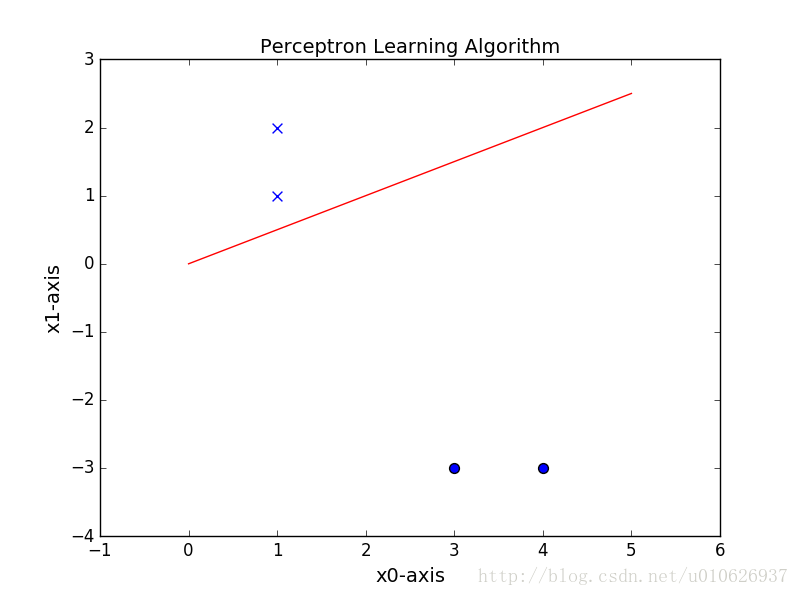
实验结果:
误分类点为: [ 3 -3] 此时的w和b为: [[ 0.]
[ 0.]] 0
误分类点为: [1 1] 此时的w和b为: [[-3.]
[ 3.]] -1
最终训练得到的w和b为: [[-2.]
[ 4.]] 0
#利用Python实现感知机算法的对偶形式
# -*- encoding:utf-8 -*-

"""
Created on 2017.6.7

@author: Ada
"""

import numpy as np
import matplotlib.pyplot as plt

#1、创建数据集
def createdata():
 samples=np.array([[3,-3],[4,-3],[1,1],[1,2]])
 labels=np.array([-1,-1,1,1])
 return samples,labels

#训练感知机模型
class Perceptron:
 def __init__(self,x,y,a=1):
  self.x=x
  self.y=y
  self.w=np.zeros((1,x.shape[0]))
  self.b=0
  self.a=1#学习率
  self.numsamples=self.x.shape[0]
  self.numfeatures=self.x.shape[1]
  self.gMatrix=self.cal_gram(self.x)

 def cal_gram(self,x):
  gMatrix=np.zeros((self.numsamples,self.numsamples))
  for i in xrange(self.numsamples):
   for j in xrange(self.numsamples):
    gMatrix[i][j]=np.dot(self.x[i,:],self.x[j,:])
  return gMatrix

 def sign(self,w,b,key):
  y=np.dot(w*self.y,self.gMatrix[:,key])+b
  return int(y)

 def update(self,i):
  self.w[i,]=self.w[i,]+self.a
  self.b=self.b+self.y[i]*self.a

 def cal_w(self):
  w=np.dot(self.w*self.y,self.x)
  return w

 def train(self):
  isFind=False
  while not isFind:
   count=0
   for i in range(self.numsamples):
    tmpY=self.sign(self.w,self.b,i)
    if tmpY*self.y[i]<=0:#如果是一个误分类实例点
     print '误分类点为:',self.x[i,:],'此时的w和b为:',self.cal_w(),',',self.b
     count+=1
     self.update(i)
   if count==0:
    print '最终训练得到的w和b为:',self.cal_w(),',',self.b
    isFind=True
  weights=self.cal_w()
  return weights,self.b

#画图描绘
class Picture:
 def __init__(self,data,w,b):
  self.b=b
  self.w=w
  plt.figure(1)
  plt.title('Perceptron Learning Algorithm',size=14)
  plt.xlabel('x0-axis',size=14)
  plt.ylabel('x1-axis',size=14)

  xData=np.linspace(0,5,100)
  yData=self.expression(xData)
  plt.plot(xData,yData,color='r',label='sample data')

  plt.scatter(data[0][0],data[0][1],s=50)
  plt.scatter(data[1][0],data[1][1],s=50)
  plt.scatter(data[2][0],data[2][1],s=50,marker='x')
  plt.scatter(data[3][0],data[3][1],s=50,marker='x')
  plt.savefig('2d.png',dpi=75)

 def expression(self,x):
  y=(-self.b-self.w[:,0]*x)/self.w[:,1]
  return y

 def Show(self):
  plt.show()


if __name__ == '__main__':

 samples,labels=createdata()
 myperceptron=Perceptron(x=samples,y=labels)
 weights,bias=myperceptron.train()
 Picture=Picture(samples,weights,bias)
 Picture.Show()
实验结果:
误分类点为: [ 3 -3] 此时的w和b为: [[ 0. 0.]] , 0
最终训练得到的w和b为: [[-5. 9.]] , -1
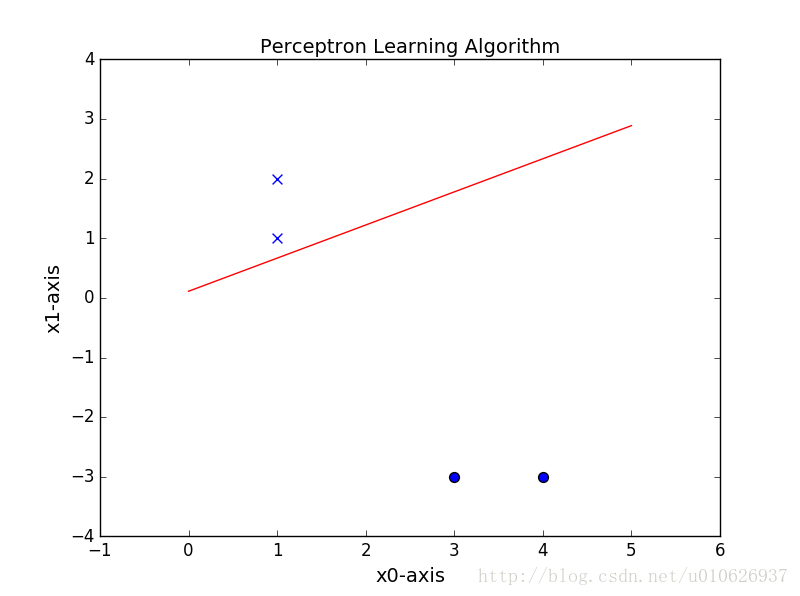
通过以上实验结果可以看出,两种方法的结果是不同的,一方面,是由于两种优化方法不同;二是,因为在选择实例点的顺序上有关系。但是无论用哪种方法,都可以找到一条直线,把数据完全分开。实际上,就算使用同一算法,如果改变初始值w0,b0,或者改变选择实例点的顺序,也可以使得结果不同。
算法二
Python的机器学习包sklearn中也包含了感知机学习算法,我们可以直接调用,因为感知机算法属于线性模型,所以从sklearn.linear_model中import下面给出例子。
# -*- encoding:utf-8 -*-

"""
利用sklearn中的感知机学习算法进行实验
Created on 2017.6.7

@author: Ada
"""

import numpy as np
import matplotlib.pyplot as plt
from sklearn.linear_model import Perceptron

#创建数据,直接定义数据列表
def creatdata1():
 samples=np.array([[3,-3],[4,-3],[1,1],[1,2]])
 labels=np.array([-1,-1,1,1])
 return samples,labels

def MyPerceptron(samples,labels):
 #定义感知机
 clf=Perceptron(fit_intercept=True,n_iter=30,shuffle=False)
 #训练感知机
 clf.fit(samples,labels)
 #得到权重矩阵
 weigths=clf.coef_

 #得到截距bisa
 bias=clf.intercept_

 return weigths,bias

#画图描绘
class Picture:
 def __init__(self,data,w,b):
  self.b=b
  self.w=w
  plt.figure(1)
  plt.title('Perceptron Learning Algorithm',size=14)
  plt.xlabel('x0-axis',size=14)
  plt.ylabel('x1-axis',size=14)

  xData=np.linspace(0,5,100)
  yData=self.expression(xData)
  plt.plot(xData,yData,color='r',label='sample data')

  plt.scatter(data[0][0],data[0][1],s=50)
  plt.scatter(data[1][0],data[1][1],s=50)
  plt.scatter(data[2][0],data[2][1],s=50,marker='x')
  plt.scatter(data[3][0],data[3][1],s=50,marker='x')
  plt.savefig('3d.png',dpi=75)

 def expression(self,x):
  y=(-self.b-self.w[:,0]*x)/self.w[:,1]
  return y

 def Show(self):
  plt.show()


if __name__ == '__main__':
 samples,labels=creatdata1()
 weights,bias=MyPerceptron(samples,labels)
 print '最终训练得到的w和b为:',weights,',',bias
 Picture=Picture(samples,weights,bias)
 Picture.Show()
实验结果:
最终训练得到的w和b为: [[-2. 4.]] , [ 0.]

算法三
利用sklearn包中的感知器算法,并进行测试与评估
# -*- encoding:utf-8 -*-
'''
利用sklearn中的的Perceptron进行实验,并进行测试
'''
from sklearn.datasets import make_classification
from sklearn.linear_model import Perceptron
from sklearn.cross_validation import train_test_split
from matplotlib import pyplot as plt
import numpy as np
#利用算法进行创建数据集
def creatdata():

 x,y = make_classification(n_samples=1000, n_features=2,n_redundant=0,n_informative=1,n_clusters_per_class=1)
 '''
 #n_samples:生成样本的数量

 #n_features=2:生成样本的特征数,特征数=n_informative() + n_redundant + n_repeated

 #n_informative:多信息特征的个数

 #n_redundant:冗余信息,informative特征的随机线性组合

 #n_clusters_per_class :某一个类别是由几个cluster构成的

 make_calssification默认生成二分类的样本,上面的代码中,x代表生成的样本空间(特征空间)
 y代表了生成的样本类别,使用1和0分别表示正例和反例

 y=[0 0 0 1 0 1 1 1... 1 0 0 1 1 0]
 '''
 return x,y

if __name__ == '__main__':
 x,y=creatdata()

 #将生成的样本分为训练数据和测试数据,并将其中的正例和反例分开
 x_train,x_test,y_train,y_test=train_test_split(x,y,test_size=0.2,random_state=0)

 #正例和反例
 positive_x1=[x[i,0]for i in range(len(y)) if y[i]==1]
 positive_x2=[x[i,1]for i in range(len(y)) if y[i]==1]
 negetive_x1=[x[i,0]for i in range(len(y)) if y[i]==0]
 negetive_x2=[x[i,1]for i in range(len(y)) if y[i]==0]

 #定义感知机
 clf=Perceptron(fit_intercept=True,n_iter=50,shuffle=False)
 # 使用训练数据进行训练
 clf.fit(x_train,y_train)
 #得到训练结果,权重矩阵
 weights=clf.coef_
 #得到截距
 bias=clf.intercept_

 #到此时,我们已经得到了训练出的感知机模型参数,下面用测试数据对其进行验证
 acc=clf.score(x_test,y_test)#Returns the mean accuracy on the given test data and labels.
 print '平均精确度为:%.2f'%(acc*100.0)

 #最后,我们将结果用图像显示出来,直观的看一下感知机的结果
 #画出正例和反例的散点图
 plt.scatter(positive_x1,positive_x2,c='red')
 plt.scatter(negetive_x1,negetive_x2,c='blue')

 #画出超平面(在本例中即是一条直线)
 line_x=np.arange(-4,4)
 line_y=line_x*(-weights[0][0]/weights[0][1])-bias
 plt.plot(line_x,line_y)
 plt.show()
实验结果为:平均精确度为:96.00
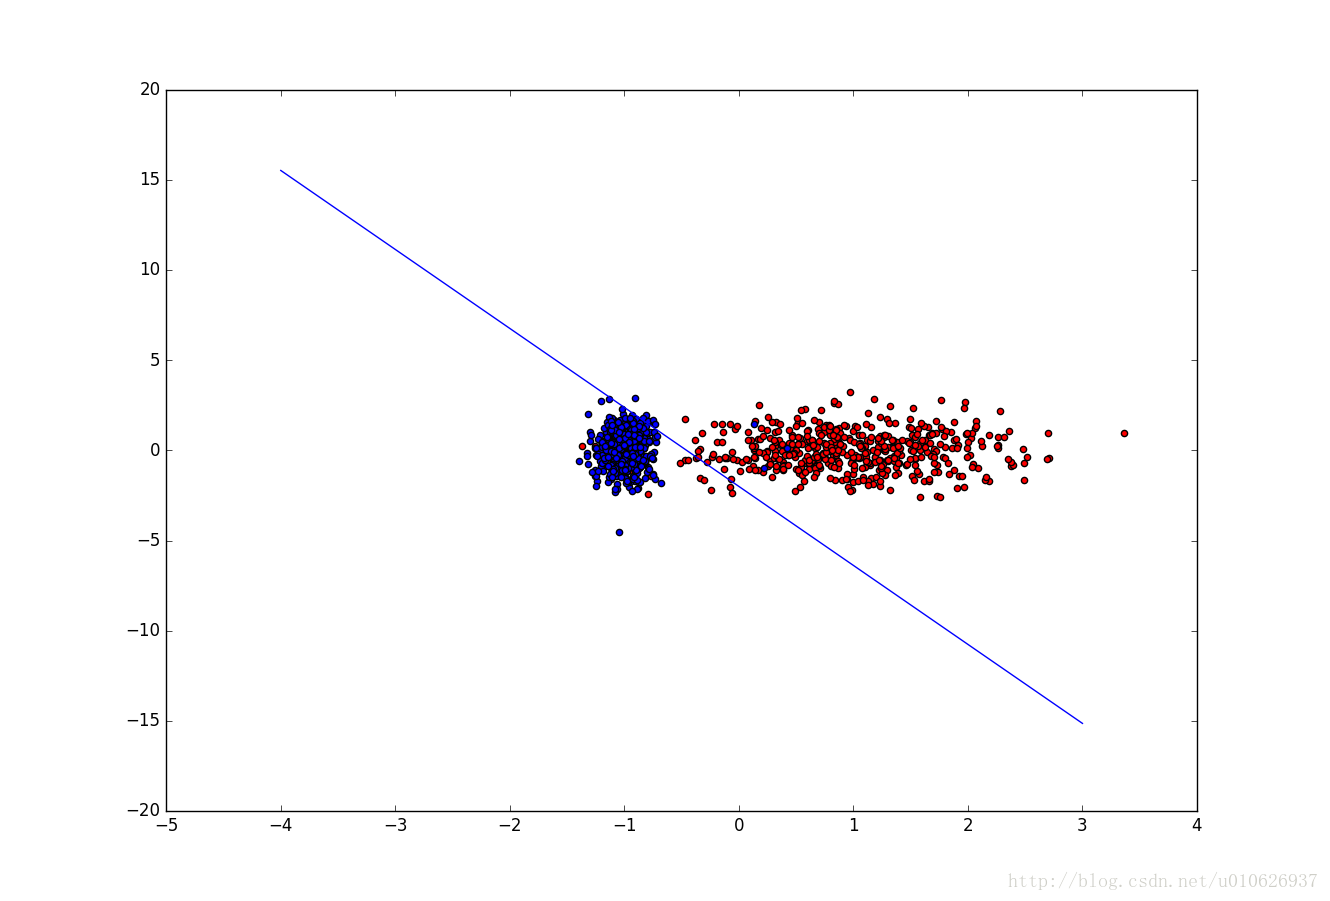
通过算法三和算法四可以看出,直接调用开源包里面的算法还是比较简单的,思路是通用的。
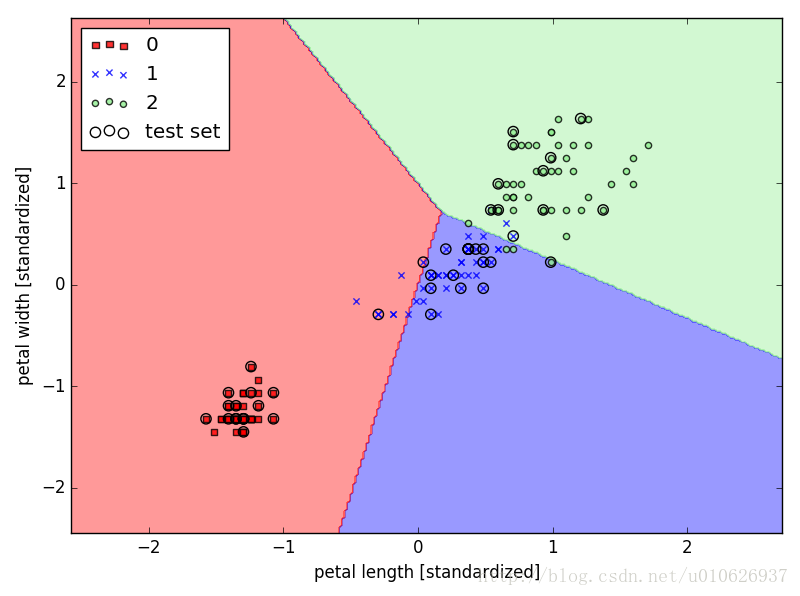
算法四
我们利用sklearn包中的感知机算法进行分类算法的实现。
# -*- encoding:utf-8 -*-
import numpy as np


'''
以scikit-learn 中的perceptron为例介绍分类算法

应用及其学习分类算法的五个步骤
(1)选择特征
(2)选择一个性能指标
(3)选择一个分类器和一个优化算法
(4)评价模型的性能
(5)优化算法

以scikit-learn 中的perceptron为例介绍分类算法
1 读取数据-iris
2 分配训练集和测试集
3 标准化特征值
4 训练感知器模型
5 用训练好的模型进行预测
6 计算性能指标
7 描绘分类界面

'''

from sklearn import datasets
import numpy as np
import matplotlib.pyplot as plt

iris=datasets.load_iris()
X=iris.data[:,[2,3]]
y=iris.target

#训练数据和测试数据分为7:3
from sklearn.cross_validation import train_test_split
x_train,x_test,y_train,y_test=train_test_split(X,y,test_size=0.3,random_state=0)

#标准化数据
from sklearn.preprocessing import StandardScaler
sc=StandardScaler()
sc.fit(x_train)
x_train_std=sc.transform(x_train)
x_test_std=sc.transform(x_test)

#引入skleran 的Perceptron并进行训练
from sklearn.linear_model import Perceptron
ppn=Perceptron(n_iter=40,eta0=0.01,random_state=0)
ppn.fit(x_train_std,y_train)

y_pred=ppn.predict(x_test_std)
print '错误分类数:%d'%(y_test!=y_pred).sum()

from sklearn.metrics import accuracy_score
print '准确率为:%.2f'%accuracy_score(y_test,y_pred)

#绘制决策边界
from matplotlib.colors import ListedColormap
import warnings

def versiontuple(v):
 return tuple(map(int,(v.split('.'))))

def plot_decision_regions(X,y,classifier,test_idx=None,resolution=0.02):
 #设置标记点和颜色
 markers=('s','x','o','^','v')
 colors=('red','blue','lightgreen','gray','cyan')
 cmap=ListedColormap(colors[:len(np.unique(y))])

 # 绘制决策面
 x1_min, x1_max = X[:, 0].min() - 1, X[:, 0].max() + 1
 x2_min, x2_max = X[:, 1].min() - 1, X[:, 1].max() + 1
 xx1, xx2 = np.meshgrid(np.arange(x1_min, x1_max, resolution),
       np.arange(x2_min, x2_max, resolution))
 Z = classifier.predict(np.array([xx1.ravel(), xx2.ravel()]).T)
 Z = Z.reshape(xx1.shape)
 plt.contourf(xx1, xx2, Z, alpha=0.4, cmap=cmap)
 plt.xlim(xx1.min(), xx1.max())
 plt.ylim(xx2.min(), xx2.max())

 for idx, cl in enumerate(np.unique(y)):
  plt.scatter(x=X[y == cl, 0], y=X[y == cl, 1],
     alpha=0.8, c=cmap(idx),
     marker=markers[idx], label=cl)

 if test_idx:
  # 绘制所有数据点
  if not versiontuple(np.__version__) >= versiontuple('1.9.0'):
   X_test, y_test = X[list(test_idx), :], y[list(test_idx)]
   warnings.warn('Please update to NumPy 1.9.0 or newer')
  else:
   X_test, y_test = X[test_idx, :], y[test_idx]
  plt.scatter(X_test[:, 0], X_test[:, 1], c='',
    alpha=1.0, linewidth=1, marker='o',
    s=55, label='test set')

def plot_result():
 X_combined_std = np.vstack((x_train_std, x_test_std))
 y_combined = np.hstack((y_train, y_test))

 plot_decision_regions(X=X_combined_std, y=y_combined,
      classifier=ppn, test_idx=range(105,150))
 plt.xlabel('petal length [standardized]')
 plt.ylabel('petal width [standardized]')
 plt.legend(loc='upper left')

 plt.tight_layout()
 plt.show()

plot_result()
实验结果为:错误分类数:4;准确率为:0.91
<完>
以上就是本文的全部内容,希望对大家的学习有所帮助,也希望大家多多支持脚本之家。
发表评论 取消回复