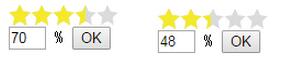
大概实现思路就是用一张灰色的星星作为背景,然后让有颜色的星星图片定位在灰色的星星图片上,控制有颜色星星图片的宽度即可达到基本效果。如下图:
下面上代码:
<html>
<head>
  <meta charset="UTF-8">
  <title>星星</title>
  <style>
    .starnone,.starWrap{
      width: 100px;
      height: 20px;
    }
    .starnone{
      position: relative;
      background: url(stars-none20px.png) no-repeat;
    }
    .star{
      position: absolute;
      top: 0;
      left: 0;
      width: 70%;
      height: 20px;
      background: url(stars20px.png) no-repeat;
    }
    #num{
      width: 30px;
    }
  </style>
</head>
<body>
  <div class="starnone">
    <div class="starWrap">
      <div class="star" id="star"></div>
    </div>
  </div>
  <div>
    <input type="text" id="num"> %
    <button id="ok">OK</button>
  </div>
  <script>
    window.onload = function(){
      var star = document.getElementById("star");
      var okBtn = document.getElementById("ok");
      var num = document.getElementById("num");
      okBtn.onclick = function(){
        var value = parseFloat(num.value);
        if (value>100) {
          alert("请小于100");
          return;
        } else if(value<0){
          alert("请大于0");
          return;
        }
        star.style.width = value + "px";
      }
    }
  </script>
</body>
</html>
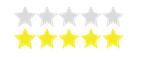
用到的两个图片。
以上就是本文的全部内容,希望对大家的学习有所帮助,也希望大家多多支持脚本之家。
发表评论 取消回复